TinyForest - Self-developed automation system for home
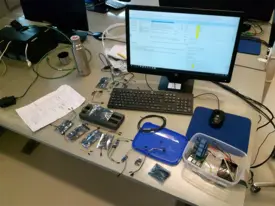
Home automation is a large field with many market products available. TinyForest is another home automation system, developed and designed from scratch for various target environments, written in Python 3 and ReactJS. In time writing this article, TinyForest core system is fully functional, and further improvements are planned. It adapts to multi-sensor and multi-device configurations, and can handle everything from irrigration and heating to light controls.
Table of Contents
1 TinyForest overview
1.1. What does it do?
TinyForest is an IoT system with multi-sensor and multi-device support. The system is developed mainly for handling full plant care processes: irrigation, UV grow lightning and temperature control. The system is intended for small environments, such as homes.
TinyForest automation system reads multiple sensor data sources to control attached devices, such as water pumps, fertilization pumps, UV lamps, heating and cooling devices. Both sensors and attached devices are fully configurable using simple configuration definitions.
1.2. Another IoT product? Why? There are many consumer-quality products available!
Full and large greenhouse automation systems have existed for a long time but they do not scale to small environments and are usually quite expensive solutions for regular customers, prices ranging from couple hundred to thousands euros/dollars.
Although consumer market has tremendous amount of various IoT solutions, the market-driving approach was not the only reason why TinyForest was developed in the first place.
This project aims to teach basic development of an IoT system: it provides valuable information about product technical development, from development team work roles & responsibilities to risk management and programming & IT infrastructure knowledge adaption to produce a real IoT solution from non-existent background. And of course, some basics of plant science…
Although many similar projects exist, their ideas or code base were not used as a reference.
1.3. How does it work?
TinyForest is designed, tested and developed from scratch. The TinyForest system consists of two main elements: back-end and front-end components, combining multiple programming technologies and integration techiques. The core back-end system is written in Python 3 and the front-end system in ReactJS.
The back-end system controls core sensor and device functionality and integrates with the operating system. The back-end reads user-defined configuration, produces log data from multiple sources and does internal process checks. Log data level, format and entry details are fully customizable.
The front-end system produces a web-based user interface, and consists of multiple tabs and graphical elements. The tabs hold information about the system, sensor data, connected devices and so on.
Both the back-end and the front-end systems were developed simultaneosly. The integration was planned but not implemented during the first project phase. The current version of TinyForest is a single node system. The first version is targeted to Raspberry Pi 3b+ as a proof-of-concept.
2 Project members and roles
As the first version of the TinyForest automation system was developed, the core team had four enthusiastic members:
| Name | Responsibilities and tasks |
|---|---|
| Juska Forelius | Project overview & scheduling, sensor calibrations & testing, back-end test code |
| Niko Hakala | Front-end development, sensor testing, target plant delivery |
| Pekka Helenius | Back-end development, sensor calibrations & testing, technical documentation, hardware components |
| Konstantin Gurin | Sensor components, sensor calibrations & testing, back-end test code |
3 Development environment
3.1. Hardware components
3.1.1. Computers
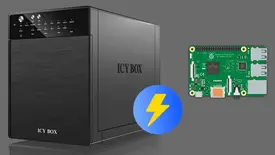
Core TinyForest system is developed for Raspberry Pi 3b+ (BCM2835). Since every multi-member development project requires a working network environment, one was quickly drafted and set up for all team members.
Development environment was duplicated for flexibility purposes: The first Raspberry Pi 3b+ MicroSD had Raspbian operating system, another Raspberry Pi 3b+ had Arch Linux ARM operating system. All changes in hardware configurations and codebase were replicated between the two. This approach both improved stability and compatibility of the developed system, and ensured the same code base run on multiple Linux distributions from the beginning with.
Some non-sensor specific parts of the codebase were developed using an Arch Linux laptop.
The final codebase was primarily targeted to Raspbian-based Raspberry Pi 3b+.
3.1.2. Sensors
TinyForest development team chose the following core sensors and sensor-related products for the project first phase:
| Sensor/Device | Description | Purpose |
|---|---|---|
| Soil moisture sensor | HW-080 | Soil moisture measurement, data for irrigation |
| Light sensor | ATmega328P | Environment illumination measurement |
| Temperature sensor | DS18B20 | Environment temperature measurement |
| Acidity (pH) sensor | PH-4502C | Soil acidity measurement, data for fertilization |
| ADC chipset | Philips PCF8591 | Convert analog sensor data to digital, Raspberry Pi compatible format using Raspberry Pi I2C GPIO channel |
Main purpose of sensors was to provide necessary input data for attached devices.
Generic 4-channel relay card was used for device attachments, including water pump (DC), lamp (230 VAC) and electric radiator (230 VAC). Physical placement of the relay card was between the output devices and energy supplies as it controlled electric current of the devices according to programmatic signals received from attached Raspberry Pi 3b+ computer.
3.1.3. Attached devices
Sensor-related devices were chosen as follows:
| Device | Model | Purpose | Attached to sensor |
|---|---|---|---|
| Liquid pump | DS766b; Amphibious, DC model 3/4.5V 80-100L/H | Water delivery to soil | Moisture sensor |
| Lamp | 230VAC regular lamp | Environment illumination | Light sensor |
| Electric radiator | 230VAC model, max. 2000W | Environment heating | Temperature sensor |
3.1.4. Excluded components
Cooling device. Extra capacity was reserved for a cooling device and the runtime code was successfully ran for it (temperature threshold). However, during the development phase, not an actual cooling device was available so it was excluded from the final physical assembly.
Fertilization pump. Another excluded device was fertilization pump. The project had two pumps and a working acidity sensor but due to time constraints it was excluded from the final assembly, as well.
Regardless, the main system was successfully assembled together.
3.1.5. Non-IT components
Used non-IT components were as follows:
| Other part/component | Description | Purpose |
|---|---|---|
| Silicone tube | 2m length; 7mm diameter | Attach to liquid pump |
| Hose clip 4 pcs | - | Tighten tube connections |
| Water container | Capacity 10L | Store water |
| Soil | - | Grow bed for plant |
| Onion | Garlic | Target plant |
| Garden pot | Small | Soil container |
3.2. Network topology
Proper preconfiguration was carried out, targeted mainly to Raspberry Pi 3b+. Initial tasks were necessary and defining working development environment was a high priority, including network topology planning and configuration.
3.2.1. Network interface names
On Linux, as network interface names use different naming today than earlier on, the syntax was changed to the earlier format for readibility purposes. Raspberry Pi 3b+ has simply two physical network interfaces: WLAN & LAN. The change is very simple: adding kernel boot parameter net.ifnames=0 turns off Predictable Network Interface Names and falls back to earlier syntax (eth0, wlan0, eth1, etc.). Alternative methods include adding custom udev MAC/device-based rules for NICs or using sysctl configuration.
3.2.2. Network IPv4 address, layer 3
3.2.2.1. Raspberry Pi 3b+
On Raspberry Pi 3b+, eth0 interface was intially configured for static network address in Raspbian-related network configuration file /etc/network/interfaces. However, as the project team preferred flexibility for the network setup, the static naming policy on Raspberry Pi 3b+ was abadoned and changed to DHCP client on eth0 which ensured proper network configuration was always retrieved from local domain DHCP server, provided by a router used in the project. Raspberry Pi 3b+ was configured to retrieve static DHCP lease based on eth0 MAC address. The lease defined IPv4 address 192.168.0.10/24 for the Raspberry Pi 3b+, router IPv4 address being 192.168.0.254 (default gateway role for local network devices, too).
Raspbian has net-tools package installed by default, providing ifconfig tool which were used to ensure proper network configuration for eth0 network interface (alt. cmd: ip address). Route table of Raspberry Pi 3b+ was also checked with ip route command (alt cmd: route, netstat -r, direct kernel route table value check).
3.2.2.2. Other network devices
Other devices in the project development environment received a dynamic DHCP lease from the router's DHCP server process. Used lease range was 192.168.0.100-192.168.0.200. The router had 4 physical LAN ports (LAN1, LAN2, LAN3, LAN4) and wireless interface. LAN ports 2-3 were reserved for computers of the project team members.
3.2.3. Internet/WAN access
WAN access was configured to router's port LAN1. This port was connected to another Raspberry Pi which was preconfigured to pass network traffic from its eth0 interface to wlan0 which was further connected to a local wireless network. The wireless network had actual internet/WAN access. Although the connection quality was inconsistent, basic internet connectivity was achieved for all team members. Another WAN access methods were used in the project, too.
Since WAN access details is not the main purpose of this project, I don't describe network configuration for the third Raspberry Pi, used between the router and a wireless device with WAN access.
3.2.3. Remote Access
Basic openssh SSH daemon service was fired up on the Raspberry Pi 3b+ with basic password authentication. Public key authentication was not used since the access was allowed only from wired LAN. Neither WAN access was not allowed nor required NAT configuration was made on the project's router. SSH daemon sshd was not enabled by systemctl enable sshd command but instead doing the same thing manually as the command does: adding symbolic link /etc/systemd/system/multi-user.target.wants/ssh.service for /usr/lib/systemd/system/sshd.service service file. TCP port 22 was allowed to retrieve inbound traffic on eth0 and allowed to have ESTABLISHED,RELATED outbound connections in the system's firewall policy (UFW and iptables).
Router's basic web service page was accessed simply using http://192.168.0.254 on the local network.
3.3. Raspberry Pi
Raspberry Pi 3b+ was one of most important parts on the project since it connected everything: code, devices and sensors. In this section, both physical connections and code structure overview are explained.
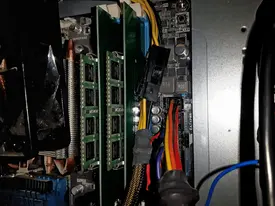
3.3.1. Wiring overview
Many physical parts were wired together, including the sensors, Raspberry Pi 3b+ and the attached devices. Planning proper wiring schematics and testing took a lot of time in the initial phase of the project: each device and sensor required specific operating amperes and voltages which must have been fully matched. For instance, inserting a pull-up resistor was necessary for a temperature sensor. Extra 5V wires were produced for Raspberry Pi 3b+ USB sockets. A water pump was wired to an USB connector, and its electricity was provided by one of those USB sockets since they had enough amperes. Raspberry Pi 3 GPIO pins have very limited capability to provide enough amperes so they were mostly excluded as a primary energy source for many devices in the project.
3.3.2. GPIO connection layout
The following Raspberry Pi 3b+ GPIO pin layout was used in the TinyForest automation system:
| Pin Row | Slot Descriptions | |
|---|---|---|
| 1 | [3v3] ADC VCC | [5v] temperature sensor VCC |
| 2 | [BCM2 (I2C1)] ADC SDA (Data) | [5v] relay card VCC |
| 3 | [BCM3 (I2C1)] ADC SCL (Clock) | [Ground] moisture sensor ground |
| 4 | [BCM4] | [BCM14] liquid pump (relay card conn.) |
| 5 | [Ground] – ADC ground (GND) | [BCM15] liquid pump (relay card conn.) |
| 6 | [BCM17] | [BCM18] |
| 7 | [BCM27] | [Ground] relay card ground |
| 8 | [BCM22] | [BCM23] |
| 9 | [3v3] moisture sensor VCC (3.3V) | [BCM24] |
| 10 | [BCM10] light sensor digital output (DO) | [Ground] |
| 11 | [BCM9] | [BCM25] lamp (relay card conn.) |
| 12 | [BCM11] | [BCM8] heating device (relay card conn.) |
| 13 | [Ground] light sensor ground | [BCM7] cooling device (relay card conn.) |
| 14 | [BCM0 (I2C0)] | [BCM1 (I2C0)] |
| 15 | [BCM5] light sensor VCC (3.3V) | [Ground] |
| 16 | [BCM6] | [BCM12] |
| 17 | [BCM13] | [Ground] temperature sensor ground |
| 18 | [BCM19] | [BCM16] temperature sensor data (W1) |
| 19 | [BCM26] | [BCM20] |
| 20 | [Ground] | [BCM21] |
3.3.3. ADC chipset
ADC chipset (Philips PCF8591) connection layout was as follows:
| ADC Pin | Raspberry Pi 3 GPIO Pin |
|---|---|
[AOUT (A out)] | [SCL] BCM3 |
[AIN0 (A in 0; 0x40)] | [SDA (0x48)] BCM2 |
[AIN1 (A in 1; 0x41)] moisture sensor | [Ground] Ground |
[AIN2 (A in 2; 0x42)] | [VCC] 3v3 |
[AIN3 (A in 3; 0x43)] empty | - |
In its default settings, only analog data bus 0x41 of ADC chipset is readable. Other AIN (“A in”) pins could be read when physical jumpers (3 pcs) on ADC chipset are altered. The reason for this logic is that built-in sensors on the chipset override external AIN (“A in”) pins when jumpers are used, thus preventing reading of any other AIN (“A in”) pins. Reading all data buses require software support which is possible on Raspberry Pi 3b+.
Although multiple analog devices can be used, the TinyForest automation system utilized only AIN0 pin for reading moisture sensor analog input between 0-255 value range. 255 stands for extremely dry whereas 0 stands for extremely wet.
3.3.4. Relay cards
4-channel relay card was used for pump and VAC device (lamp, electric radiator) controls. The card wiring diagram:
| Relay Card Pin | Raspberry Pi 3 GPIO Pin |
|---|---|
[Ground] | Ground |
[IN1 (In 1)] | BCM 14 (liquid pump) |
[IN2 (In 2)] | BCM25 (lamp) |
[IN3 (In 3)] empty | - |
[IN4 (In 4)] | BCM8 (heating device) |
[VCC] | 5V power |
3.3.5. Operating system
As mentioned before, the project had two target Raspberry Pi 3b+ computers. One with Raspbian OS, the other one with Arch Linux ARM. From the project aspect, many differences between the two were actually in operating system level, including kernel module names, package names, package availability and firewall solutions. The TinyForest automation system didn't implement any necessary OS-specific solutions neither in back-end nor in front-end codebase.
3.3.5.1. Software components
The TinyForest automation system was mostly based on open source software components. Raspbian had most of the required packages available in default DPKG repositories (/etc/apt/sources.list) and so did Arch Linux ARM in its pacman repositories. Few packages required compilation from source code.
3.3.5.2. Group and user policies
Device accessibility. By default, Linux kernel policy allows direct device access only for root user in user space. This baseline raised issues on TinyForest configuration as the developed IoT solution required direct TinyForest process user access to temperature sensor, I2C devices and GPIO pins. The strict security policy was considered in all aspects in the project and principle of least privilege was followed. Using root user for TinyForest processes was simply prohibited by the project team.
The project team used two different approaches to address the device access issue:
1) two new groups were created: gpio (for GPIO pin access) and i2c (for ADC chipset access). TinyForest process user kasviloordi (“plant lord”) was added. User kasviloordi was added to the new groups. Group gpio was permitted to read and write GPIO device file /dev/gpiomem and group i2c was granted same permissions to /dev/i2c-0 and /dev/i2c-1 ADC chipset device files.
Basic commands used in this approach were as follows:
| Command | Description | Notes |
|---|---|---|
sudo groupadd gpio | Add system group gpio | Requires root permissions* |
sudo usermod -a -G gpio <user_name> | Add user <user_name> to gpio group | Requires root permissions* |
grep gpio /etc/group | Ensure members of gpio group | - |
sudo chown root.gpio /dev/gpiomem | Determine user root, group gpio as owner of /dev/gpiomem device file | Requires root permissions* |
sudo chmod g+rw /dev/gpiomem | Add read and write permissions for gpio group to file /dev/gpiomem | Requires root permissions* |
* In most Linux systems, sudo can be used to temporarily gain root permissions. Ensure you have proper security policy on your Linux system, including /etc/sudoers configuration. Some Linux distributions determine sudo group, others use wheel group for proper sudo access.
2) Another approach does not add gpio or i2c groups but grants TinyForest process group all necessary permissions with udev ruleset in /etc/udev/rules.d/. The process group was granted read and write permissions to /dev/gpiomem and /dev/i2c-0 + /dev/i2c-1 device files. This solution was used in the final project security policy solution.
3.3.5.3. ADC chipset behavioral analysis
Open source I2C tools (Raspbian repositories: i2c-tools) were used to communicate with attached ADC chipset Philips PCF8591. The package tools allow both reading and writing operations. Core tools include i2cdetect, i2cset and i2cdump binaries. The tools provided valuable information regarding to chipset analog-to-digital operations with Raspberry Pi 3b+ bus 1 SDA and SDL GPIO pins. Both root permissions and knowledge of used physical bus used for ADC are required when using the tools.
Proper I2C device use require kernel modules i2c_bcm2835 and i2c_dev (modprobe <module_name> or kernel module load configuration list in /etc/modules-load.d/).
In older Raspberry Pi targeted Linux kernels module
i2c_bcm2708was used instead ofi2c_bcm2835.Although kernel module for
pcf8591exists, it should not be used because it does not implement proper functionality for Raspberry Pi based computers
3.3.5.4. Temperature sensor analysis
Used temperature sensor is so called one-wire device, known as W1 device. The temperature sensor requires proper kernel modules w1_gpio and w1_therm to be loaded. After successful connection, a new one-wire device appears as device file /sys/devices/w1_bus_master1/<device serial ID>/w1_slave (symbolic link /sys/bus/w1/devices/<device serial ID>/w1_slave) which the temperature sensor uses for real time temperature data reporting.
3.3.5.5. Back-end operating system components
Back-end of the TinyForest automation system is written in Python 3. In addition to the basic Python 3 interpreter, several Python 3 open source modules were used: RPi.GPIO (GPIO pin management), py-smbus (System Bus; ADC chipset management), threading (sensor management), w1thermsensor (temperature sensor management) and logging (log system). Many built-in Python 3 modules are used: os, pwd, stat, time and so on.
Linux systems which produce large quantity of log data usually has logrotate service for archive purposes. The TinyForest automation system utilizes logrotate having proper configuration in /etc/logrotate.d/ folder. As any other service in Systemd-based Linux systems, logrotate is enabled by using systemctl enable logrotate && systemctl start logrotate command sequence. The actual service file is /usr/lib/systemd/system/logrotate.service.
TinyForest back-end system was delivered as a system process and has proper Systemd service file /usr/lib/systemd/system/tinyforest-backend.service.
3.3.5.6. Front-end operating system components
Front-end of the TinyForest automation system uses npm, reactjs, nodejs and Apache web server as its core system components.
3.4. Other systems used in development
Both back-end and front-end development were partially separated from direct Raspberry Pi 3b+ environments.
Front-end core elements were mostly developed in Windows 10 laptop whereas back-end core elements were developed in Arch Linux laptop, excluding sensor functionality.
Produced codebases were regularly tested on target Raspberry Pi systems to minimize possible conflicts early on.
4 Back-end
4.1. General overview
Main role of the Tinyforest back-end system is to create basis for reading sensor data and react to variable conditions by controlling attached devices. The system was targeted to a single-node Raspberry Pi 3b+ mini-computer. Main principles in development were modularity, flexibility and easy configurability of the system. The back-end generates informative and analyzable output log data in preferred format.
4.2. Log streams and log format overview
The back-end system has process functionality for each sensor and has possibility to produce process log data to three different streams: command line (Standard Output Stream; stdout), generic log file (/var/log/tinyforest/tinyforest.log) and JSON log file (/var/log/tinyforest/tinyforest.log.json).
Each log stream can be turned on and off. All log entry details and log file path are configurable in TinyForest configuration file /etc/tinyforest/tinyforest.conf. Some fine-tunable log parameters are:
| Log parameter | Description | Example |
|---|---|---|
| hostname | Print IoT device host name | tinyforest_host |
| datetime | Print log time stamp | 09/11/19 07:54 PM |
| log_level | Print log level | INFO |
| message | Print log message | sensor data |
4.3. Installation and version control overview
Since the TinyForest automation system was developed simultaneously both to Raspbian and Arch Linux ARM, a granular and continuously working package management procedure was required. In the end, this management procedure auto-generated .deb and .tar.xz installation packages in seconds whenever developer wanted it during the development. Using a centralized package management was absolutely valuable since it automated Linux system configuration, dependency tracking and user + device management. In other words: the TinyForest automation system could be installed on every supported device without manual configurations. However, although the installation process was fully automated, some user intervention is still required regarding to attached device JSON configuration files in /etc/tinyforest/json/ path.
Another benefit gained from the package management was provided flexibility to coding: any changes in codebase and TinyForest system configurations could be quickly tested whenever wanted.
4.4. Development
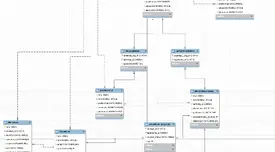
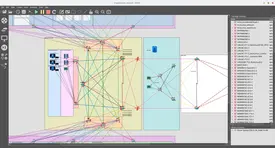
Development process took 2 months during which approximately 2000 lines of effective Python 3 was written. The code writing process started with sensor controls but soon after need for other system-related functionality was notified so internal Python 3 modules were starting to take form. Since the development team wanted to keep quality of the system-related code high, a lot of time was used to write it. Internal code logic structure was planned alongside the writing and system testing, and updated UML diagram was utilized. Sequence diagram was excluded to reduce unnecessary overhead.
The development included continuous testing to minimize errors and typos early on, and keep the codebase in organized form.
The development team used and Git version control for back-end development. Internal, strongly protected Git server was used for this purpose. A new Git user role was created for this project, and several commits were merged on weekly basis.
The TinyForest back-end configuration implements several debugging parameters which can be turned on for the system development. Debugging support was implemented due to gain flexibility for the project environment since some development took place on a Linux laptop which does not have requires sensor capabilities that Raspberry Pi 3b+ has. Therefore, debugging was used to increase TinyForest back-end process output verbosity and to bypass several sensor-related system checks.
Project finale was internally developed back-end version 0.1.0.
4.5. Code structure
4.5.1. Overview
The TinyForest back-end process follows a simple logic:
read configuration, initialize process
check process input data, deliver configuration data to each sensor and attached devices
start sensor processes, continously observe the processes, write log output streams
This structure is logical and systematic: each process step depends on the previous step and each step include internal checks which must be passed to proceed to the next step. Middle checks improve security, prevent erroneous configurations and enforce correct code blocks to be executed.
As sensor JSON configuration data provides, at least theoretically, a major basis for code exploitations, a massive amount of validation checks are performed for it. Any injection attempts are prevented before passing them as parameters to the actual TinyForest process. The process must not read or accept any invalid input data, and ensuring this secure behavior has been a major priority during TinyForest back-end development.
Basically, TinyForest back-end codebase has the following structure:
| Process phase | Purpose | Description |
|---|---|---|
| 1 | Configuration | Read TinyForest back-end configuration values |
| 2 | Logging system | Initialize logging process |
| 3 | Main system | Perform initial system and process checks |
| 4 | JSON read & check functions | Validate and read all JSON sensor configuration data |
| 5 | Sensor system | Initialize sensor processes |
| 6 | Sensor processes | Start and continuously read sensor data, control attached devices |
The back-end process can be halted or interrupted in any time, and aborted in a controlled manner.
4.5.2. Error handling, actions, logging
The TinyForest back-end system has many exception handling procedures and informs about encountered failures and errors. FATAL ERROR status means the process is immediately halted. ERROR status indicates a major conflict but the main process may still continue. However, the situation requires a correct fix. WARNING indicates that some process part can't be executed but the main process is being kept alive. INFO informs user about the process current state, and DEBUG gives detailed (verbose) information about the process state.
TinyForest back-end log levels are as follows:
| Log level | Description | Action | Example |
|---|---|---|---|
| INFO | Information regarding to process current state | Process continues | Load JSON configuration, read sensor |
| WARNING | Warning regarding to process current state | Part of the process may be skipped | Defined sensor has configuration errors |
| ERROR | Error in process current state, partial failure | Part of the process is stopped | Process user does not have required read permission to JSON sensor configuration |
| FATAL ERROR | Critical error in process current state, full failure | The whole process is stopped | Process is started by root which is prohibited |
| DEBUG | Useful data during system development | Give more verbose information about the process | Continuous sensor data stream, not only when sensor state changes |
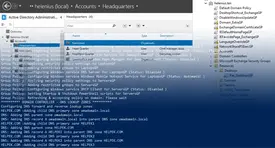
 1[22/Nov/2019 10:47:17] INFO [tinyforest]: Loaded JSON configuration for sensor 'Moisture sensor (1)'
 2[22/Nov/2019 10:47:17] WARNING [tinyforest]: Output device 'UV lamp (1)' for sensor 'Light sensor (1)' has been disabled. Either this is intended or the device has not required GPIO pin value in JSON configuration file /etc/tinyforest/json/profile_plant1_v01.json
 3[22/Nov/2019 10:47:17] WARNING [tinyforest]: Sensor 'Light sensor (1)' has been disabled. Either this is intended or the sensor has not required GPIO pin value in JSON configuration file /etc/tinyforest/json/profile_plant1_v01.json
 4[22/Nov/2019 10:47:17] INFO [tinyforest]: Loaded JSON configuration for sensor 'Temperature sensor (1)'
 5[22/Nov/2019 10:47:17] WARNING [tinyforest]: Output device 'Fertilizer pump (1)' for sensor 'pH sensor (1)' has been disabled. Either this is intended or the device has not required GPIO pin value in JSON configuration file /etc/tinyforest/json/profile_plant1_v01.json
 6[22/Nov/2019 10:47:17] WARNING [tinyforest]: Sensor 'pH sensor (1)' has been disabled. Either this is intended or the sensor has not required GPIO pin value in JSON configuration file /etc/tinyforest/json/profile_plant1_v01.json
 7[22/Nov/2019 10:47:17] INFO [tinyforest]: Started sensor process for sensor 'Moisture sensor (1)'
 8[22/Nov/2019 10:47:17] INFO [tinyforest]: Started sensor process for sensor 'Temperature sensor (1)'
 9[22/Nov/2019 10:47:32] INFO [tinyforest]: sensorfunctions.py, temperature (305)]: Temperature sensor (1): temperature (22.25) is below tolerance value 26.0 celsius
10[22/Nov/2019 10:47:32] INFO [tinyforest]: sensorfunctions.py, temperature (305)]: Battery (1) is warming
11[22/Nov/2019 10:48:01] INFO [tinyforest]: Water pump (1) OFF (GPIO pin: 14, triggered by Moisture sensor (1))
12[22/Nov/2019 10:48:15] INFO [tinyforest]: Temperature sensor (1): temperature (22.5) is below tolerance value 26.0 celsius
13[22/Nov/2019 10:48:15] INFO [tinyforest]: Battery (1) is warming
14...
15[22/Nov/2019 10:48:21] INFO [tinyforest]: Temperature sensor (1): temperature is 26.1875 celsius
16[22/Nov/2019 10:48:22] INFO [tinyforest]: Temperature sensor (1): temperature is 26.6875 celsius
17... 1{
2 "system_file": { "loglevel": "INFO", "msg": {"info": "file created", "user": "kasviloordi", "file": "/var/log/tinyforest/tinyforest.log.json"}, "time": { "day": 22, "month": 11, "year": 2019, "hour": 1, "minute": 47, "second": 29 } },
3 "system_file": { "loglevel": "INFO", "msg": {"info": "file opened", "user": "kasviloordi", "file": "/var/log/tinyforest/tinyforest.log.json"}, "time": { "day": 22, "month": 11, "year": 2019, "hour": 1, "minute": 47, "second": 29 } },
4 "sensor": { "loglevel": "INFO", "msg": {"name": "Moisture sensor (1)", "description": "loaded JSON configuration", "source": "/etc/tinyforest/json/profile_plant1_v01.json"}, "time": { "day": 22, "month": 11, "year": 2019, "hour": 1, "minute": 47, "second": 29 } },
5 "json_check": { "loglevel": "WARNING", "msg": {"description": "Light sensor (1): output device UV lamp (1) disabled", "source": "/etc/tinyforest/json/profile_plant1_v01.json"}, "time": { "day": 22, "month": 11, "year": 2019, "hour": 1, "minute": 47, "second": 29 } },
6 "sensor": { "loglevel": "WARNING", "msg": {"name": "Light sensor (1)", "description": "disabled", "source": "/etc/tinyforest/json/profile_plant1_v01.json"}, "time": { "day": 22, "month": 11, "year": 2019, "hour": 1, "minute": 47, "second": 29 } },
7 "sensor": { "loglevel": "INFO", "msg": {"name": "Temperature sensor (1)", "description": "loaded JSON configuration", "source": "/etc/tinyforest/json/profile_plant1_v01.json"}, "time": { "day": 22, "month": 11, "year": 2019, "hour": 1, "minute": 47, "second": 29 } },
8 "json_check": { "loglevel": "WARNING", "msg": {"description": "pH sensor (1): output device Fertilizer pump (1) disabled", "source": "/etc/tinyforest/json/profile_plant1_v01.json"}, "time": { "day": 22, "month": 11, "year": 2019, "hour": 1, "minute": 47, "second": 29 } },
9 "sensor": { "loglevel": "WARNING", "msg": {"name": "pH sensor (1)", "description": "disabled", "source": "/etc/tinyforest/json/profile_plant1_v01.json"}, "time": { "day": 22, "month": 11, "year": 2019, "hour": 1, "minute": 47, "second": 29 } },
10 "sensor": { "loglevel": "INFO", "msg": {"name": "Moisture sensor (1)", "description": "started process", "source": "/etc/tinyforest/json/profile_plant1_v01.json"}, "time": { "day": 22, "month": 11, "year": 2019, "hour": 1, "minute": 47, "second": 29 } },
11 "sensor": { "loglevel": "INFO", "msg": {"name": "Temperature sensor (1)", "description": "started process", "source": "/etc/tinyforest/json/profile_plant1_v01.json"}, "time": { "day": 22, "month": 11, "year": 2019, "hour": 1, "minute": 47, "second": 29 } },
12 "system_file": { "loglevel": "INFO", "msg": {"info": "file opened", "user": "kasviloordi", "file": "/var/log/tinyforest/tinyforest.log.json"}, "time": { "day": 22, "month": 11, "year": 2019, "hour": 1, "minute": 49, "second": 12 } },
13 "sensor": { "loglevel": "INFO", "msg": {"name": "Moisture sensor (1)", "description": "loaded JSON configuration", "source": "/etc/tinyforest/json/profile_plant1_v01.json"}, "time": { "day": 22, "month": 11, "year": 2019, "hour": 1, "minute": 49, "second": 12 } },
14 "json_check": { "loglevel": "WARNING", "msg": {"description": "Light sensor (1): output device UV lamp (1) disabled", "source": "/etc/tinyforest/json/profile_plant1_v01.json"}, "time": { "day": 22, "month": 11, "year": 2019, "hour": 1, "minute": 49, "second": 12 } },
15 "sensor": { "loglevel": "WARNING", "msg": {"name": "Light sensor (1)", "description": "disabled", "source": "/etc/tinyforest/json/profile_plant1_v01.json"}, "time": { "day": 22, "month": 11, "year": 2019, "hour": 1, "minute": 49, "second": 12 } },
16 "sensor": { "loglevel": "INFO", "msg": {"name": "Temperature sensor (1)", "description": "loaded JSON configuration", "source": "/etc/tinyforest/json/profile_plant1_v01.json"}, "time": { "day": 22, "month": 11, "year": 2019, "hour": 1, "minute": 49, "second": 12 } },
17 "json_check": { "loglevel": "WARNING", "msg": {"description": "pH sensor (1): output device Fertilizer pump (1) disabled", "source": "/etc/tinyforest/json/profile_plant1_v01.json"}, "time": { "day": 22, "month": 11, "year": 2019, "hour": 1, "minute": 49, "second": 12 } },
18 "sensor": { "loglevel": "WARNING", "msg": {"name": "pH sensor (1)", "description": "disabled", "source": "/etc/tinyforest/json/profile_plant1_v01.json"}, "time": { "day": 22, "month": 11, "year": 2019, "hour": 1, "minute": 49, "second": 12 } },
19 "sensor": { "loglevel": "INFO", "msg": {"name": "Moisture sensor (1)", "description": "started process", "source": "/etc/tinyforest/json/profile_plant1_v01.json"}, "time": { "day": 22, "month": 11, "year": 2019, "hour": 1, "minute": 49, "second": 12 } },
20 "sensor": { "loglevel": "INFO", "msg": {"name": "Temperature sensor (1)", "description": "started process", "source": "/etc/tinyforest/json/profile_plant1_v01.json"}, "time": { "day": 22, "month": 11, "year": 2019, "hour": 1, "minute": 49, "second": 12 } }
21}4.6. Security
Security has been a major factor in TinyForest back-end code development. Since the back-end system was written from scratch in tight time schedule, and many features were implemented to get the core automation system functional, not fully extended or compherensive security/penetration test was performed in the project scope and, therefore, existence of possible security bugs can't certainly be denied. In other words, there may be underlying security bugs the development team is not aware of. In general, it's typical that some bugs are not detected in a specific software development cycle.
Security consists of system user and permission policy, process internal checks and exception handling. The codebase has 52 check and exception handling events. root can't be used to run the process by default. However, using root is possible but it requires changes to /etc/tinyforest/tinyforest.conf configuration file. Altering contents of the configuration file requires root permissions.
Security policy is considered in device, file and folder permissions in operating system level. Several TinyForest file permissions are as follows:
| Owner | Group | Permission bits | File |
|---|---|---|---|
root | process group | 0640 (-rw-r-----) | Process main configuration file tinyforest.conf |
root | process group | 0750 (drwxr-x---) | Sensor JSON configuration data folder /etc/tinyforest/json/ |
root | process group | 0660 (-rw-rw----) | Sensor JSON configuration file |
| process user | process group | 0750 (drwxr-x---) | Process log folder /var/log/tinyforest/ |
| process user | process group | 0640 (-rw-r-----) | Process log file |
AppArmor profile for TinyForest was not used but it may be encouraged in critical environments.
4.7. Connected sensors
4.7.1. Relation to the operating system
Configuration of /boot/config.txt in the Linux system is relevant for the sensor initial statuses during Raspberry Pi 3b+ boot up. For instance, if the sensor pin initial status is set to HIGH in the boot configuration file, the equal configuration must exists in TinyForest sensor JSON configuration if the sensor is enabled.
Sensors determined in the TinyForest back-end system require correct read and write permissions to GPIO pins, I2C and W1 devices, and of course, that the devices are found by the underlying Linux system. TinyForest process user must have these permissions. If the back-end system does not find or can't use determined sensor, it gives a proper warning about the situation and ignores the sensor in the runtime process.
4.7.2. Operating logic
Sensor output data stream is continuously read, although it is determined by value thresholds and intervals given to individual sensors in JSON configuration: when data value exceeds a specific value limit, sensor-specific attached devices are either turned on or off. The TinyForest process does not provide log entries if sensor or device status is not changed compared to the previous situation. This setting can be overriden by using DEBUG log level.
Sensor active and passive times can be determined using proper month, week, weekday and clock values in JSON configuration. Sensors can flexibly be enabled or disabled in specific months, in specific weeks or weekdays of each month, and in specific clock intervals in each weekday.
Maximum keep-alive time for each attached device is considered, thus preventing device activity due to faulty sensor readings. Once the keep-alive time is exceeded, any attached devices are turned off. Attached devices are liquid pumps, electric radiators, lamps etc. Once the maximum keep-alive time is exceeded, sensor reading is checked again.
3.7.3. Configuration definitions and attributes
Sensor and device configuration is determined in properly formatted JSON files in path /etc/tinyforest/json/<file>.json. Each sensor and attached device must have the following attribute data:
Is sensor enabled or disabled?
Sensor type (GPIO/I2C/W1)
Sensor physical connection pin
Sensor pin idle and active state values
Sensor human readable name
Sensor value thresholds for active and idle states; exceeding value limits turn on/off connected devices
Maximum active time of connected devices
Enable or disable connected devices?
Sensor read value check interval
Sensor active time
Month (January … December)
Week (1 … 4
Day (Monday … Sunday)
Clock (00.00 … 23.59)
Connected devices
Enabled or disabled?
Physical pin number
Pin value determination: active and idle values
Device human readable name
The TinyForest automation system validates every attribute before passing configuration to the main back-end process.
4.7.4. Calibration, limits and thresholds
Project light and moisture sensors have built-in hardware potentiometers as embedded components. Potentiometers are used as dynamic resistors between two non-equal voltages. Typical features include seamless resistance level configuration: changing the resistance alters to sensor sensitivity.
Potentiometers were physically calibrated. Accepted calibration level reflected to the sensor threshold configuration in the TinyForest back-end sensor configuration files. Since some sensors were attached to Raspberry Pi 3b+ using digital output and some using analog output, fine-tuned configuration steps and hardware planning was required. For instance, any sensor connected to Analog-to-Digital (ADC) PCF8591 chipset provided analog value range 0-255 whereas directly GPIO-connected sensors provided digital value range 0-1 to the Raspberry Pi 3b+. Since potentiometer calibration altered sensor overall sensitivity, calibration must have been done regardless of output data stream format (analog or digital). Since value range of digital output data was extremely narrow, calibration correctness was even more important.
Calibration of selected temperature sensor was not trivially possible but both the light sensor and the moisture sensor were calibrated: former according to the darkness, and the latter according to the moisture level.
The following table describes some sensor data value ranges and threshold values used in the TinyForest project:
| Sensor | Data Type | Possible Value Range | Physical Calibration | Programmatically defined threshold values |
|---|---|---|---|---|
| Moisture sensor | Analog; ADC | 0: extremely humid; 255: extremely dry | Yes, potentiometer | Lower limit: 110 * Upper limit: 170 ** |
| Light sensor | Digital; GPIO | 0: dark; 1: bright | Yes, potentiometer | Lower limit: 0 *** Upper limit: 1 **** |
| Temperature sensor | Analog; W1 | Celsius value | No | 25.00 +- 3.00 ***** |
Legend:
* If measured value is lower than 110, activate or deactivate attached devices (liquid pump). Soil is wet.
** If measured value is greater than 170, activate or deactivate attached devices (water pump) for 5 seconds at maximum. Soil is dry, requires more water.
*** If measured value is 0, activate or deactivate attached devices (lamp) for 6000 seconds at maximum. Environment is dark.
**** If measured value is 1, activate or deactivate attached devices (lamp). Environment is bright.
***** If measured temperature value is lower than 22.00, activate electric radiator for 600 at maximum. If temperature is greater than 28.00, activate cooling device. Any temperature between 22-28, do nothing.
4.8. Front-end integration
Starting front-end development for the TinyForest automation system was decided early on. Therefore, the back-end system has some elements which support the front-end such as support for strictly formatted log entries and log entry format customization for front-end needs. Command line and regular tinyforest.log log entries are more freely formatted but JSON-typed log entries can be parsed by the front-end code. JSON log support was implemented bit later.
Back-end development considered continous nature of the back-end process (log data, sensor readings, device controls) and basic recovery. Therefore, the back-end implemented daemon-like real time process structure which could be utilized by the front-end part.
5 License and publication model
The TinyForest development team did not form consensus about the publication or license model for the back-end code. The code was developed in restricted environment. Therefore, the back-end codebase is not released, e.g. as open source code.
6 Front-end
TinyForest front-end is based on React.js and node.js JavaScript libraries. Main purpose of the front-end was to determine and introduce a user-friendly way to monitor, manage and customize the TinyForest automation system.
The front-end is web-based and consists of a basic HTTP website which has multiple tabs, categorized by different information, such as: “Home” (front page), “System information” (system status etc.) and “My Plants” (sensor, device and plant monitoring). The front-end part is released as open source and can be found on GitHub - NikoHakala/tinyforest.
7 Successes and failures
In many parts, the project was a success. As outcome, the first TinyForest version 0.1.0 was developed. The first version includes many sensor and device features, main priorities were successfully implemented and system functionality was tested. The back-end system is lacks some features. For now, it's quite bug free in common use and works as intended. The system is not consumer ready as it lacks some fundamental product designs and hardware customization possibilities. The system is not that widely tested so we can't talk about consumer-ready product yet even in that aspect.
Front-end and back-end integration failed. Although both parts were simultaneously developed, the final integration phase provided some challenges as back-end lacked some key technologies required for flexible integration. The front-end part was also considered not as adaptable to the back-end and system processes as thought at first. Implementing support for back-end JSON log data introduced a medium size challenge which could not be overcome in the determined time schedule. As the development team had only two weeks left for the project, the team decided to postpone the front-end and back-end integration and, instead, finish the first version of the TinyForest automation system so it could reasonably be demonstrated to other people.
The development team did not consider integration important enough in early phases of the project but focused more on specific front-end and back-end parts instead since the whole system was written and planned from scratch. The integration is still doable with little effort and does not represent a major overall failure to the project in the future.
The front-end and back-end integration should be possible with different technologies such as with SQL relational databases.
8 Summary
Project taught a lot since it combined many different aspects from infrastructure to code structure planning, required seamless team work and motivated development team. Project diversely utilized network, sensor and programming technologies, combining both physical (hardware + environment) and logical (code + configuration) environments.
The TinyForest project task diversity highlighted role of seamless and successful team work. The project had front-end (UI) and back-end development, physical hardware topology design and hardware integration, budgeting, and writing of non-technical and techical reports during the whole project time. In the project aspect, it was important that everyone in the project team had a determined role, opinions, brought fresh ideas and were active inside the team.
The first version of the TinyForest automation system was a success, although some setbacks in front-end and back-end integration occured. These setbacks are solvable, however. The main project goal was to develop a working IoT system from scratch and the goal was achieved.